How to Build a Backyard Walkway Using Cheap Pavers Fast
Let’s turn that muddy goat path to your grill into a legit walkway without torching your budget. You don’t need a contractor, a diamond saw, or a second mortgage. You just need a plan, some sweat equity, and pavers that don’t pretend to be marble. Ready to save cash and still get compliments from nosy neighbors? Let’s dig in—literally.
Pick Your Paver Style (Cheap Doesn’t Mean Boring)
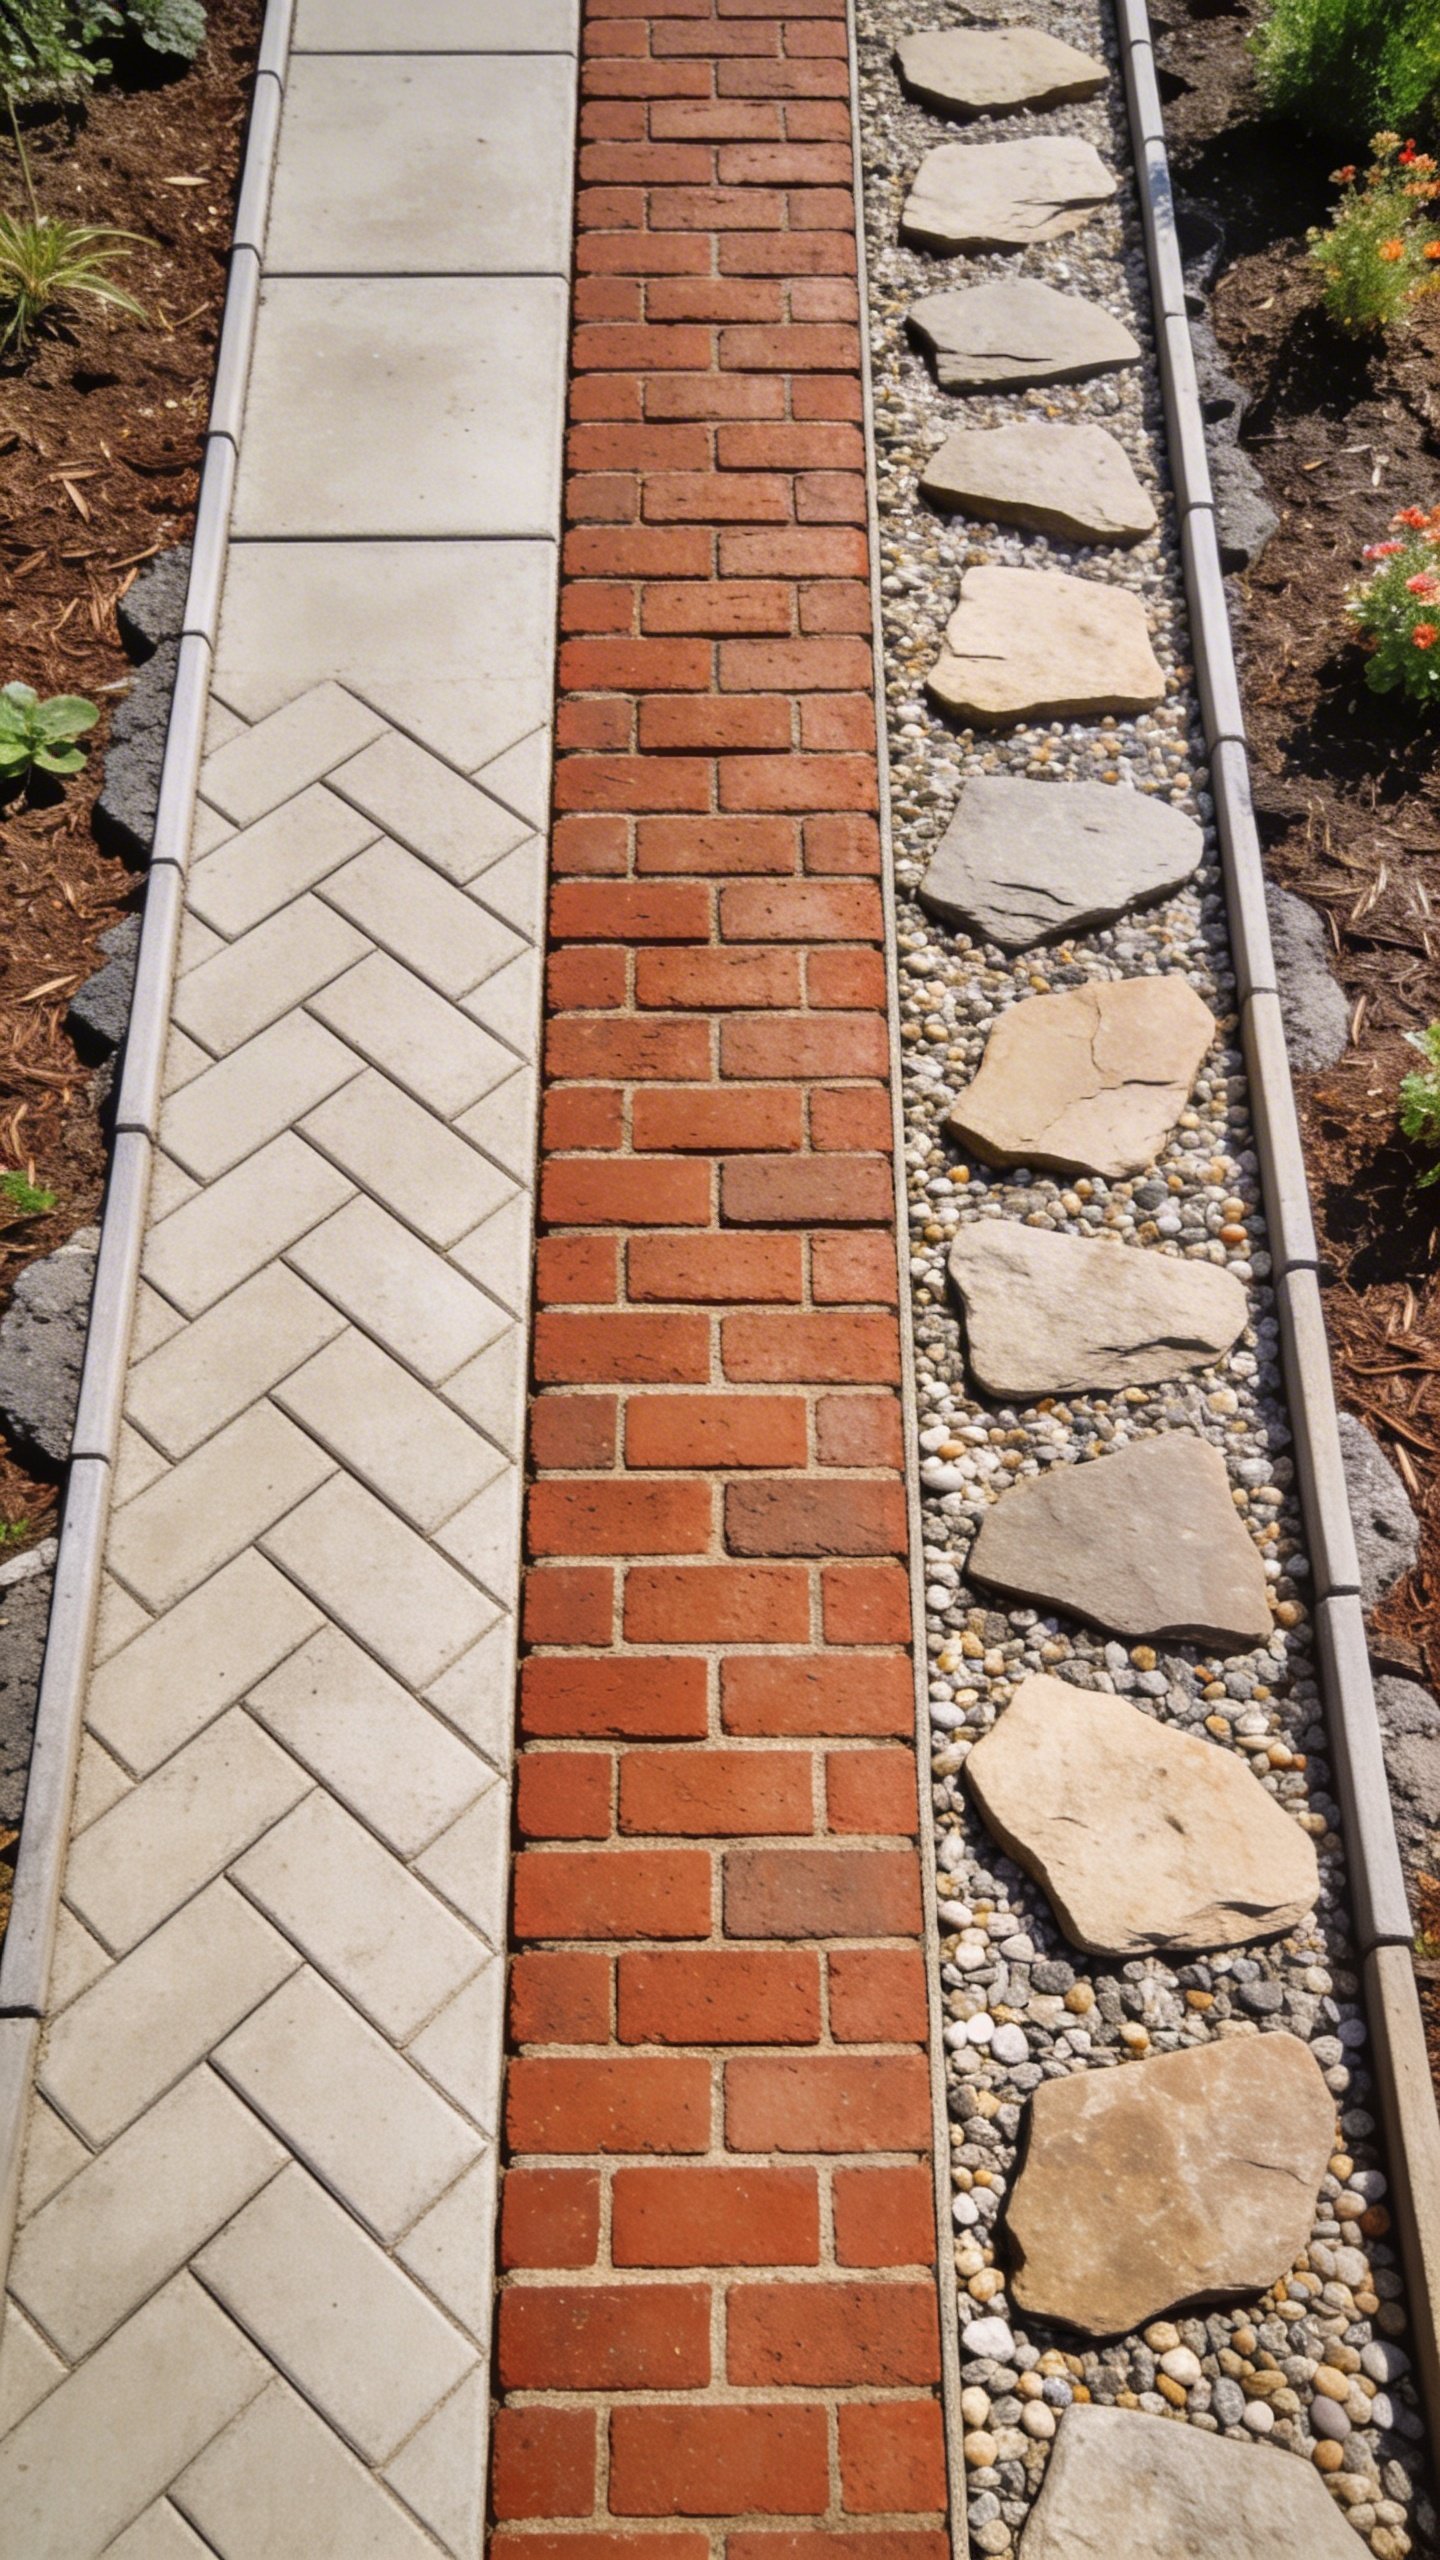
You’ve got options, and yes, they can look classy on a budget. Concrete pavers usually win for cost and durability. You can grab basic rectangles, squares, or those chunky “stone-look” ones on sale.
Tired of snacking when you’re not even hungry? This reset helps you stop the loop and feel back in control.
A simple reset for moments when cravings take over. Easy to use, easy to repeat, and designed to help you feel satisfied instead of stuck.
- Concrete pavers: Most affordable, tons of shapes, easy to replace if one cracks.
- Brick pavers: Classic look, sometimes pricier, but check clearance pallets—goldmine.
- Stepping stones: Cheapest for a spaced path with gravel or mulch between.
Smart Money-Saving Tips
- Hit end-of-season clearance—contractors over-order, stores unload cheap.
- Buy “seconds” or imperfect pavers; imperfections disappear once you install and sweep in sand.
- Mix styles for pattern interest if your store stock looks random—call it “eclectic rustic.”
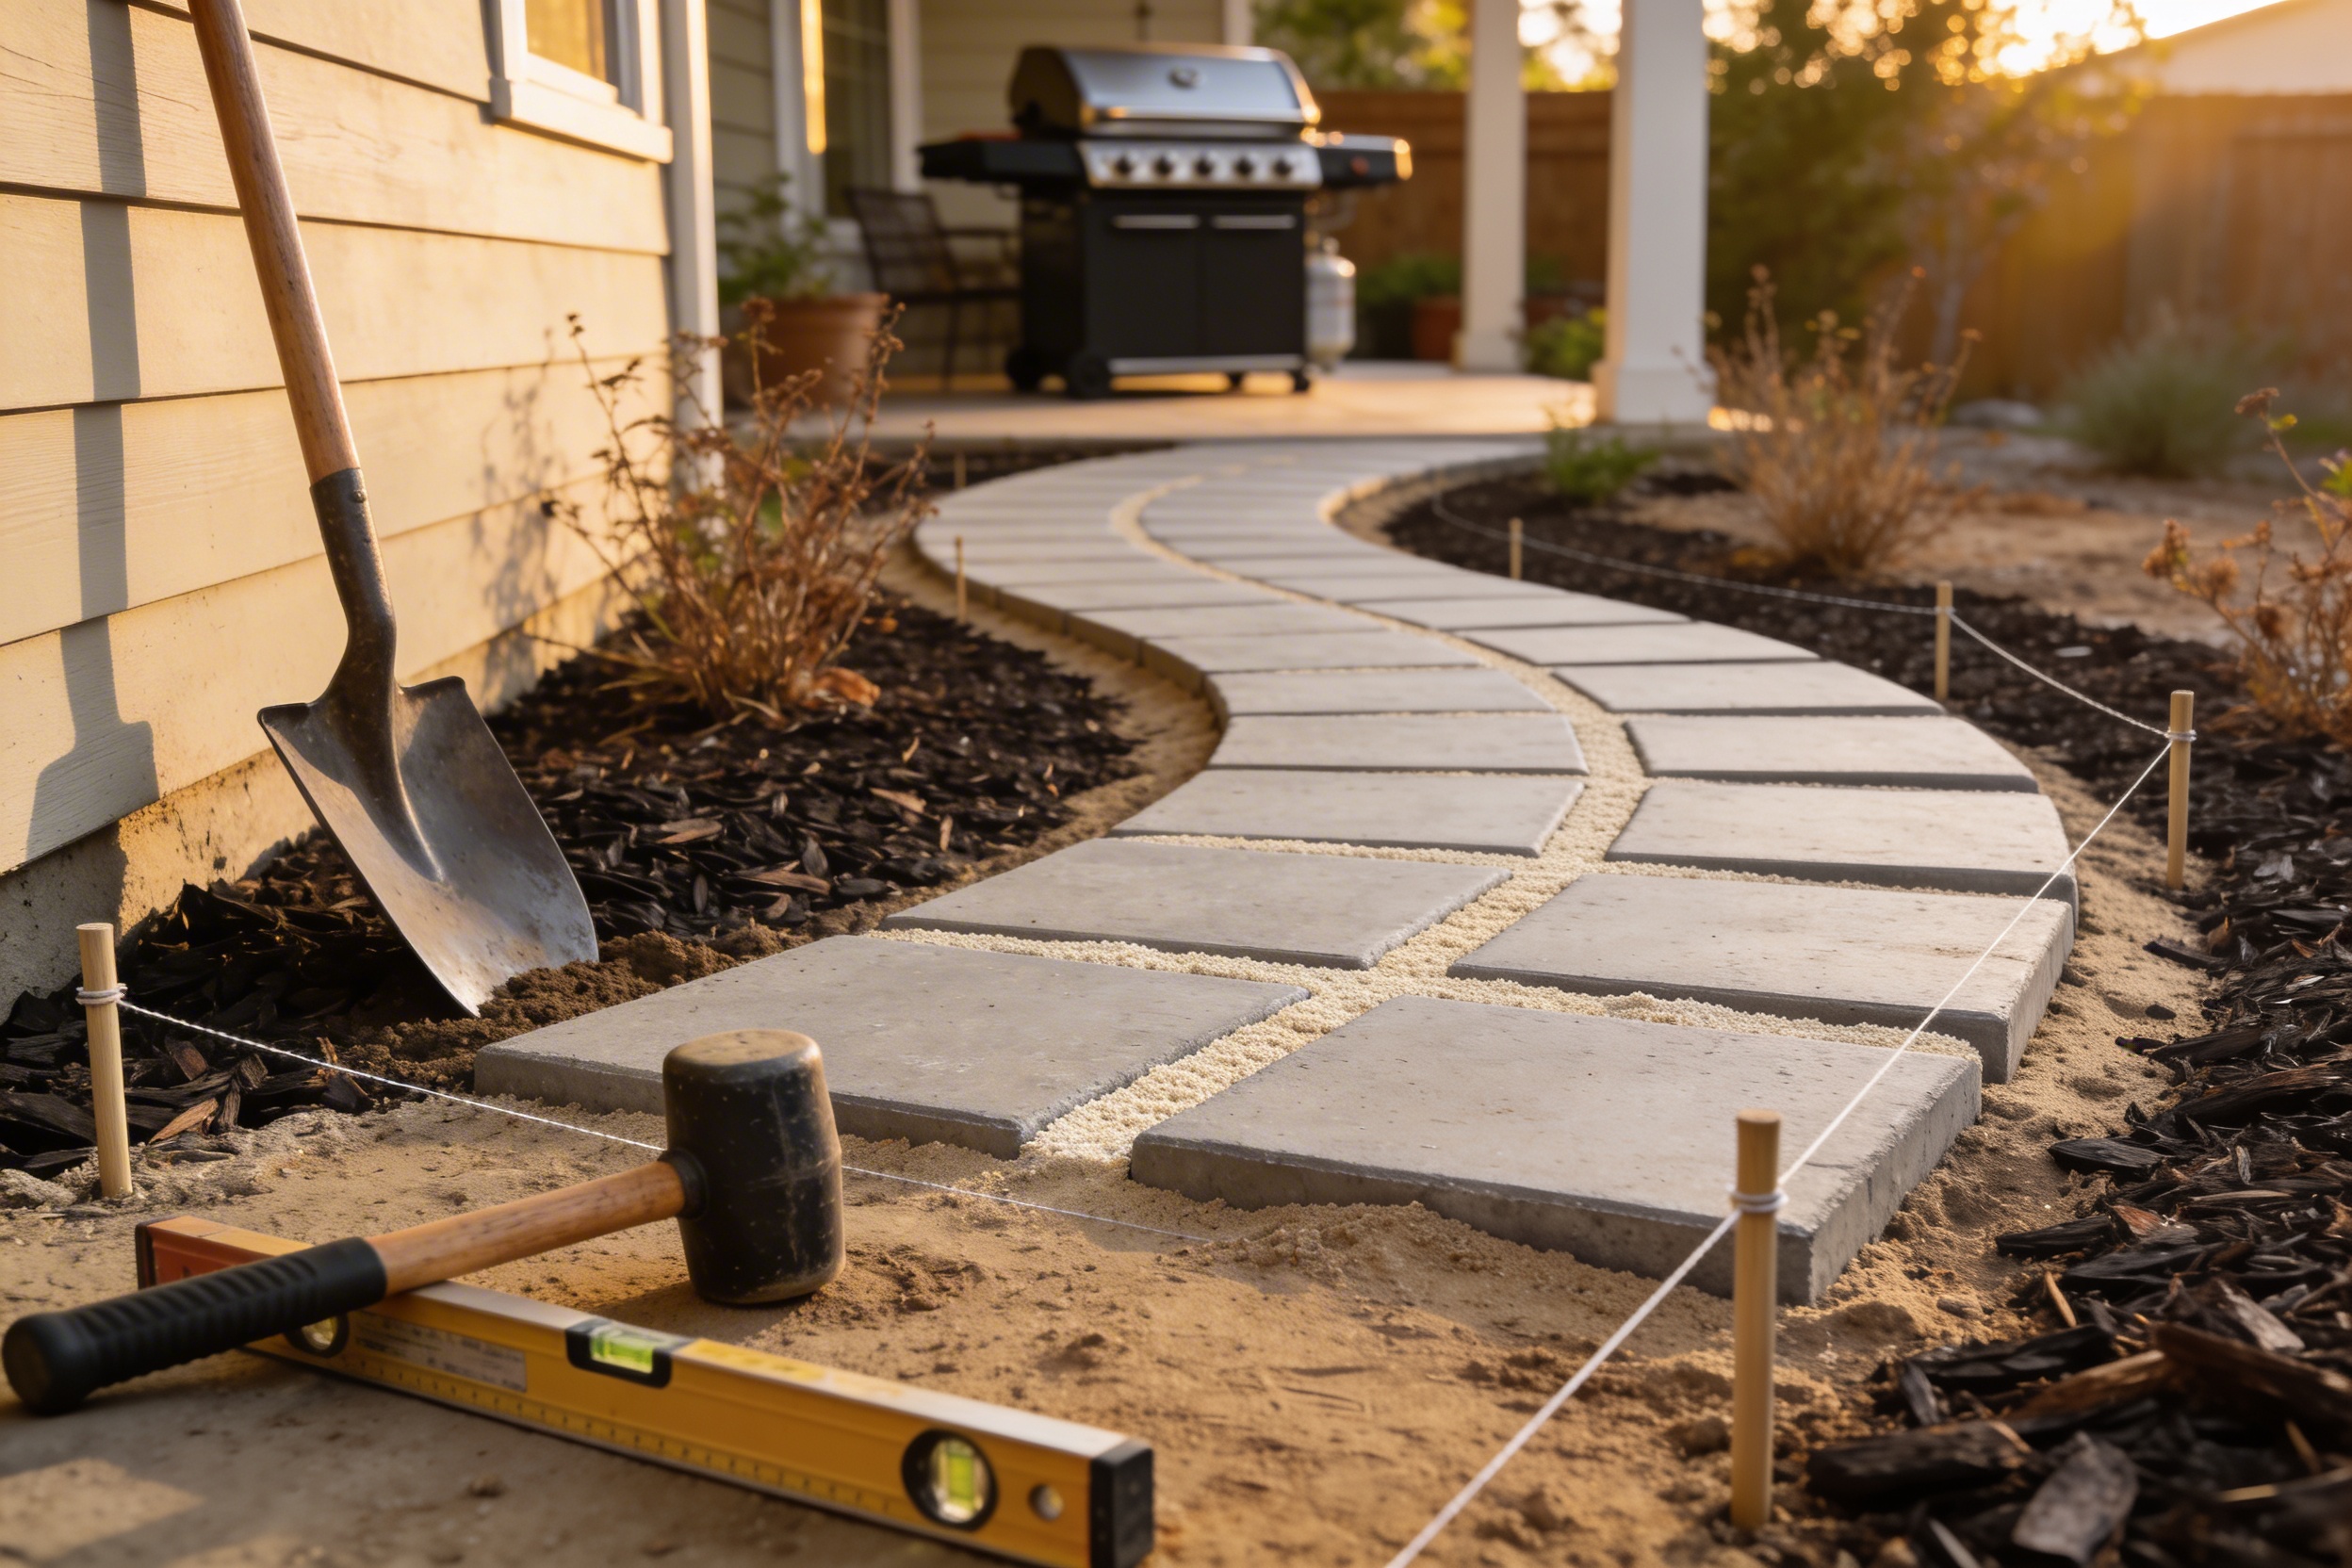
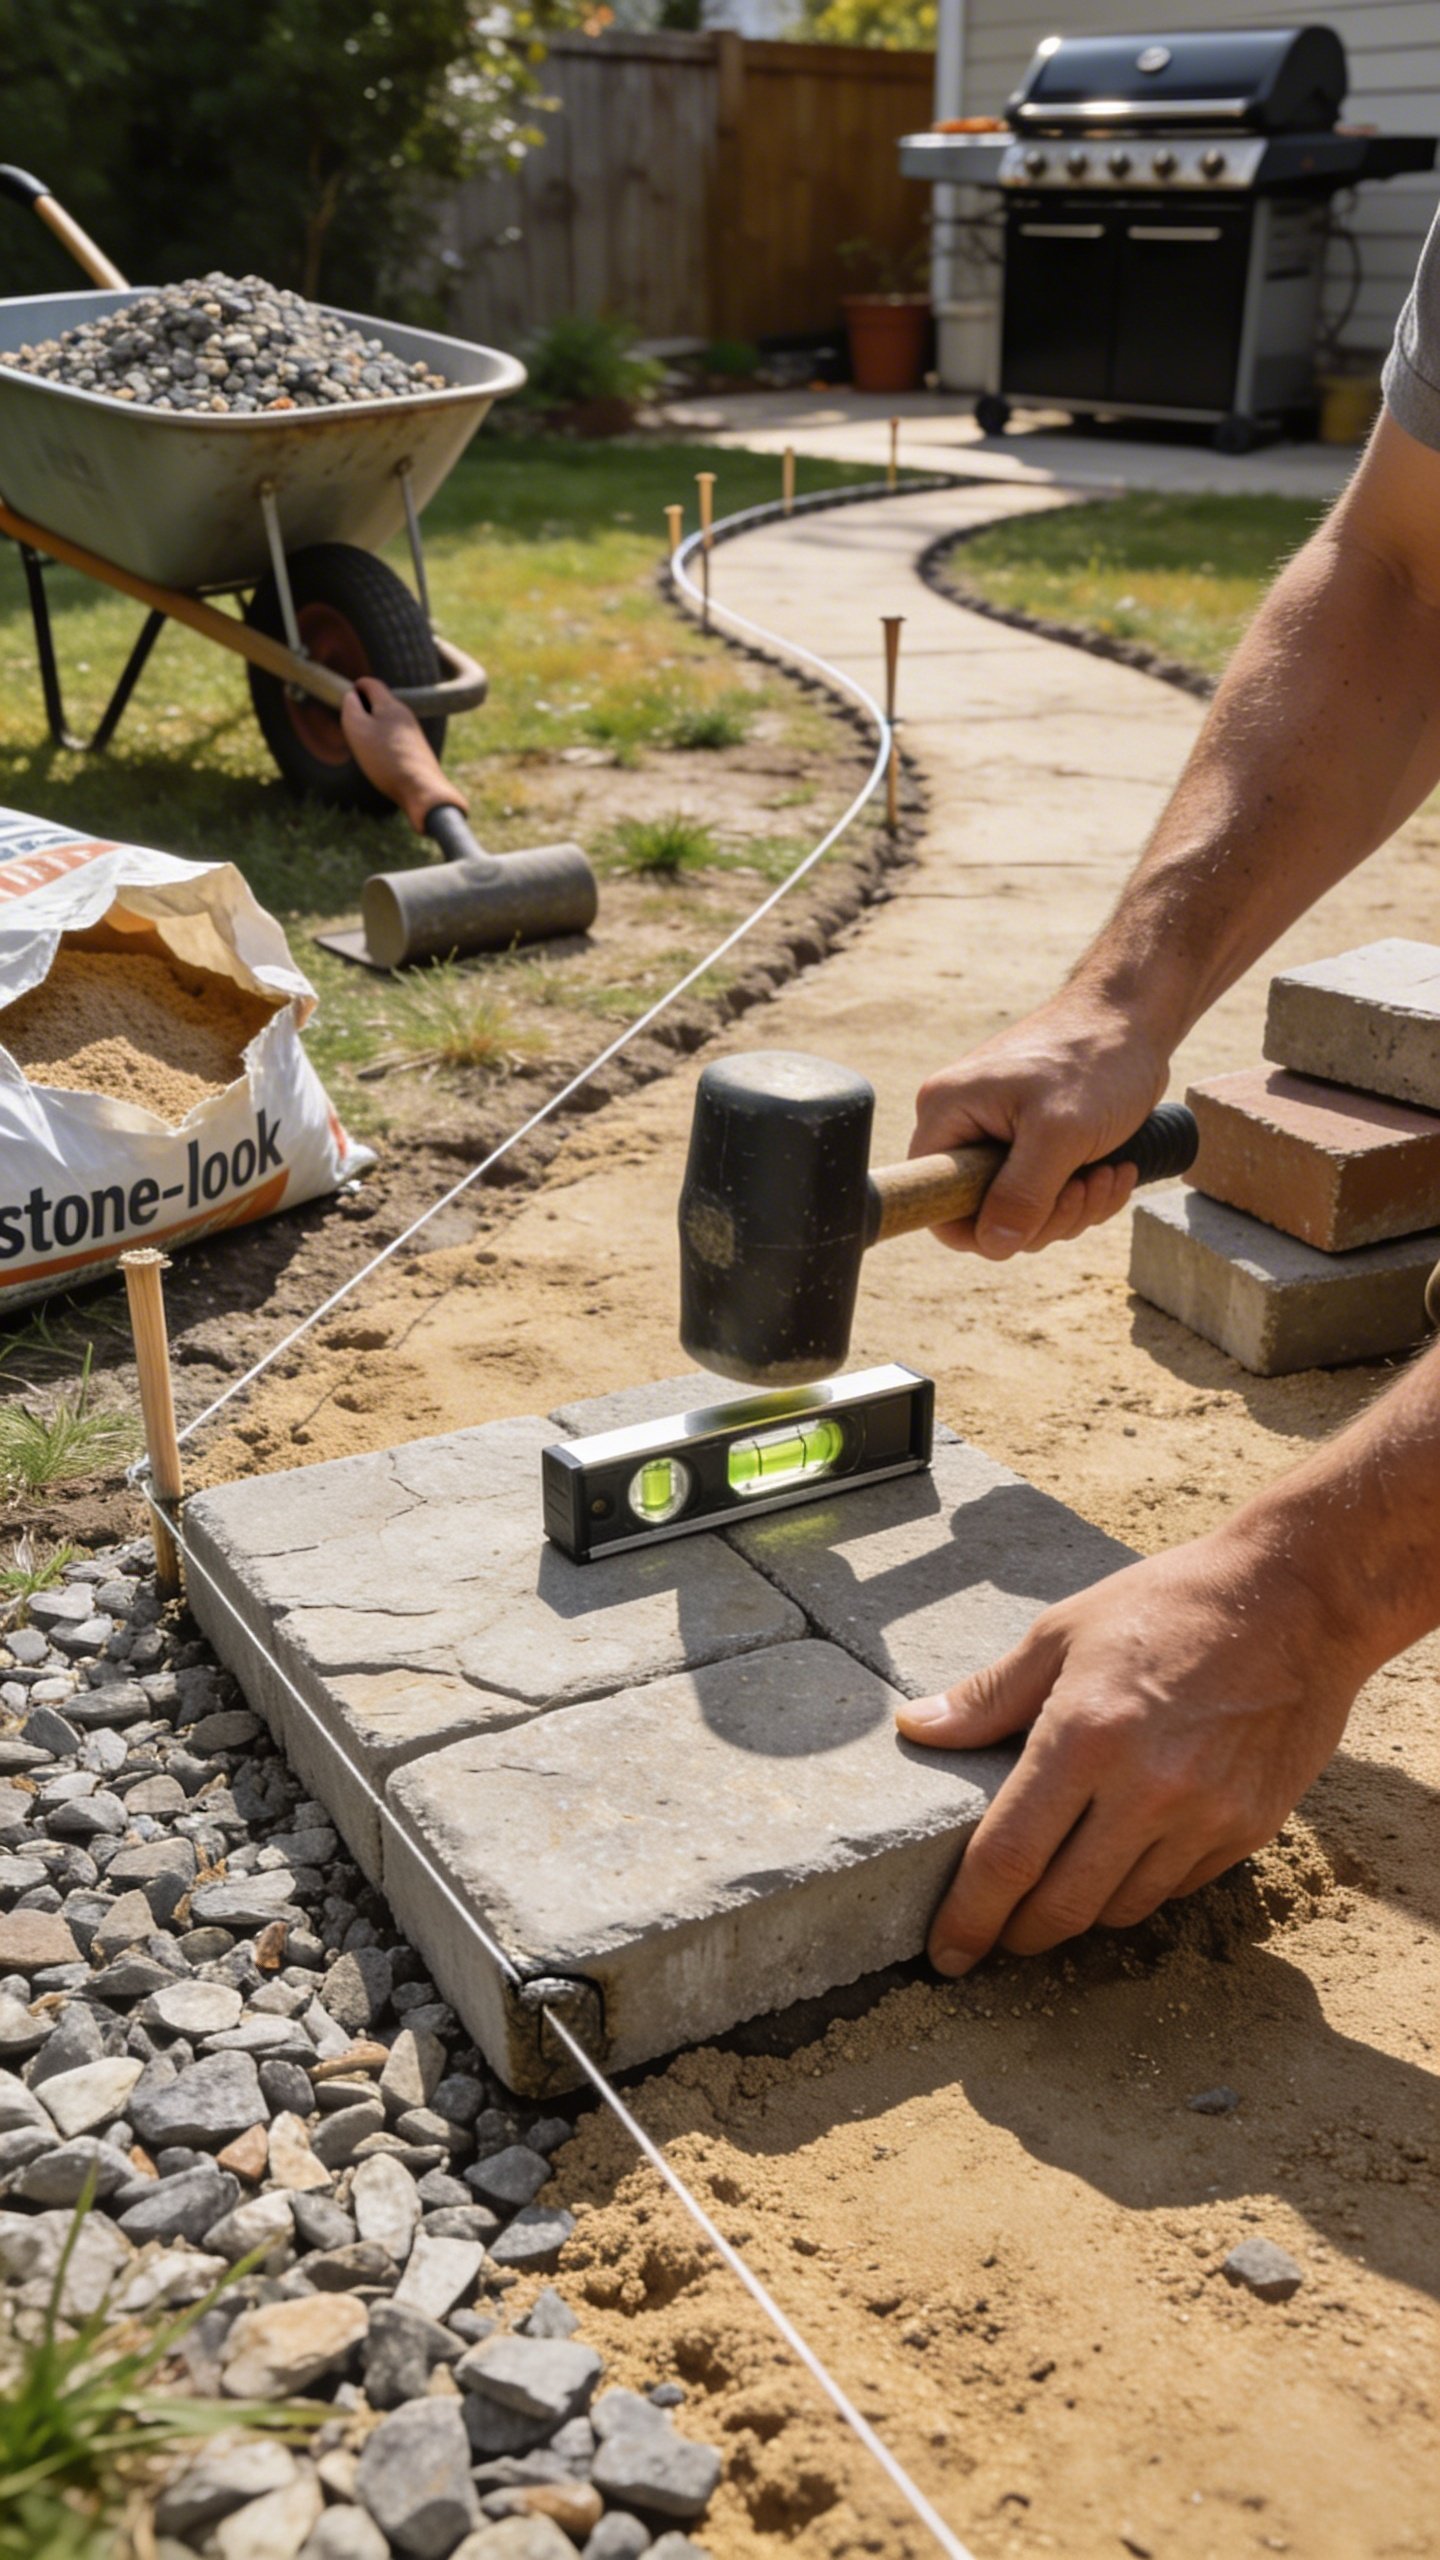
Map The Route Like A Pro (String + Spray Paint)

Walk your yard and choose the most natural line from A to B. Avoid sharp angles that feel awkward. Curves look fancy and hide small layout mistakes.
- Stake and string: Outline the edges of your path with string lines. Keep it even.
- Paint the layout: Use landscape spray paint to trace the path on the ground.
- Check width: Standard is 36 inches for comfy walking. For stepping stones, aim for a stride-length of 18–24 inches center-to-center.
Quick Design Wins
- Make the path slightly wider at entrances—hello, visual welcome.
- Add subtle curves. They feel intentional and “garden-y.”
- Plan spots for solar lights now, not after you’ve finished and cried.
Prep The Ground (The Unsexy Part That Makes It Last)
This is where cheap pavers look expensive: a solid base. Skipping this step equals wobbly tiles and regrets.
- Dig the trench: Remove sod and soil to a depth of 4–6 inches for foot traffic paths. Add paver thickness to calculate total depth. Example: 2-inch paver + 4-inch base = 6 inches total.
- Slope for drainage: Aim for about 1/4 inch drop per foot away from the house. Water loves to ruin nice things—don’t invite it.
- Compact the soil: Tamp with a hand tamper or rent a plate compactor for bigger paths. Solid base = fewer trips later.
Base Layers That Actually Work
- Landscape fabric (optional but helpful): Suppresses weeds and keeps base separate from soil.
- Crushed stone or road base (3–4 inches): Spread in 2-inch lifts and compact each lift.
- Sand layer (1 inch): Screed it level with a straight board over two 1-inch pipes. Remove pipes, fill grooves, resist the urge to step on it.
Lay The Pavers Without Losing Your Mind
Time for the satisfying part. You’ve earned it.
- Start from a straight edge: Work from your most visible side or a hard edge (patio, driveway).
- Set pavers gently: Place, don’t drag. Keep joints tight but not crushing. Maintain your pattern.
- Check level as you go: Use a small torpedo level. Tap down with a rubber mallet to seat each paver.
- Edge restraint: Install plastic paver edging staked into the base. This keeps the path from “melting” outward over time.
Easy Patterns That Look Designer
- Running bond: Staggered rows. Simple, forgiving, classic.
- Basketweave: Two-by-two alternations. Looks fancy, still easy.
- Stepping-stone path: Place single stones spaced for stride; fill with gravel or mulch around them.
Lock It In: Sand, Seal, And Smile
Give your path the final touches that make it rock-solid.
Transform Your Home With 7,250+ Stunning Landscaping Designs—No Expensive Designers Needed!
- 🌿 Access 7,250+ stunning landscaping designs.
- 💰 Save thousands—no pro designer needed.
- 🏡 Plans for gardens, patios, walkways, and more.
- ✨ Simple, beginner-friendly DIY layouts.
- 🛠️ Customize any design to fit your yard.
- Joint sand: Sweep polymeric sand or regular paver sand into the joints. Polymeric resists weeds better, IMO.
- Compact again: A quick tamp settles the pavers and pulls in more sand. Sweep and repeat once.
- Mist to activate (if polymeric): Light spray, don’t flood. Follow the bag’s instructions like it’s a sacred text.
- Optional sealer: Enhances color and makes cleanup easier. Wait until everything dries fully.
Budget-Friendly Edge Fillers
- Pea gravel: Soft look, great drainage.
- Mulch: Cheapest filler, needs refreshing yearly.
- Crushed granite: Firm underfoot, nice texture, low maintenance.

Make It Pop With Simple Upgrades
Small touches elevate the whole vibe without wrecking your budget.
- Solar stake lights: Instant ambiance. Place every 6–8 feet.
- Border row: Use a contrasting paver color for a custom look.
- Planting strip: Tuck in low groundcovers or thyme along the edge for that cottage-core flex.
- Gravel shoulders: A 4–6 inch gravel strip on both sides keeps mud at bay.
Common Mistakes (And How You Dodge Them)
You’re not making these, because FYI, you’re reading this.
- Skipping the base: The path will settle and trip you forever. Always compact layers.
- Zero slope: Water pools and algae parties start. Keep that 1/4 inch per foot grade.
- High edges near a mower: You’ll scalp the grass. Keep pavers slightly above or flush with surrounding grade.
- Gluing every joint: Don’t. Let sand do its job so the path can flex seasonally.
FAQs
How much does a cheap paver walkway actually cost?
Expect roughly $4–$8 per square foot if you do it yourself, including base materials. Stepping-stone styles with mulch or gravel can dip even lower. Sales and reclaimed materials can slice costs more, IMO.
Do I need a plate compactor, or can I just use a hand tamper?
For short paths under 20 feet, a hand tamper works if you’re patient. For longer runs or clay-heavy soil, rent a plate compactor for a couple of hours. Your back and your walkway will both thank you.
What’s the best base material for budget builds?
Crushed stone (like 3/4″ minus or road base) gives the most stable foundation at a reasonable price. Avoid round pea gravel under pavers—it shifts too much. Save pea gravel for side fill or decorative zones.
How do I stop weeds between pavers?
Good base prep and landscape fabric help a ton. Use polymeric sand in the joints and reapply as needed every few years. If weeds sneak in, a quick hand-pull or vinegar spray keeps them humble.
Can I lay pavers directly on dirt?
You can, in the same way you can wear flip-flops to a snowstorm. It “works” briefly, then sinks and shifts. Even a minimal base—2 inches of compacted crushed stone plus 1 inch of sand—beats bare soil by miles.
What if my yard isn’t level?
No problem. Follow the natural grade but maintain a smooth walking surface. Cut shallow terraces if needed, and step down with small rises every 8–10 feet rather than one big drop. Keep consistent slope for drainage.
Conclusion
You don’t need fancy stone or a pro crew to build a walkway that looks sharp and handles foot traffic like a champ. Focus on a solid base, simple patterns, and small upgrades that stretch your dollars. In a weekend, you can go from muddy shuffle to smooth stride—and your budget won’t even flinch. Now grab a shovel and make your backyard path happen.